How to Design a Checkerboard End-Grain Cutting Board
The checkerboard is the pattern that started countless woodworkers down the end-grain rabbit hole — and for good reason.
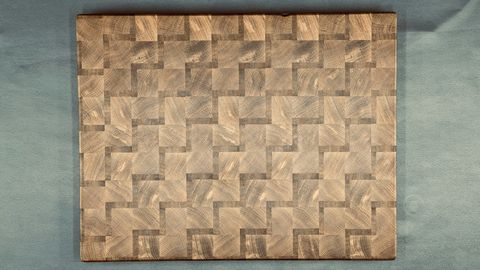
If you browse r/woodworking or any woodworking forum in 2026, you'll notice the checkerboard end-grain cutting board keeps appearing in "first project" posts, gift-season threads, and beginner tutorials alike. It's having a sustained moment — not because it's new, but because it's the perfect intersection of approachable geometry and stunning results.
Unlike the 3D cube illusion or herringbone, the checkerboard doesn't require angled cuts or complex jigs. The geometry is straightforward: two species of wood, straight strips, and a 90-degree glue-up that almost anyone with a table saw can pull off. The result still stops guests mid-sentence.
This guide covers everything you need to plan a checkerboard end-grain board before buying a single board-foot of lumber.
Why the Checkerboard Is the Ideal First End-Grain Project
The checkerboard earns its "beginner-friendly" reputation for a few concrete reasons:
- No angled cuts. Every strip is ripped square. Your table saw sled stays at 90 degrees the entire time.
- Two species is all you need. Walnut and maple is the classic combination — widely available, food-safe, and high-contrast.
- The math is simple. Strip width determines square size, and square count determines board dimensions. No trigonometry involved.
- Mistakes are forgiving. Off by a hair on a strip width? The pattern still reads as a checkerboard. With the 3D cube illusion, the same error breaks the optical effect entirely.
For experienced builders, the checkerboard is also a reliable gift board: universally appealing, works in any kitchen, and the contrast between light and dark wood photographs well enough that recipients share it on social media without prompting.
Choosing Your Wood Species
You need contrast. A checkerboard where both species are similar in tone just looks like a board with subtle stripes — the alternating dark-light grid is what makes the pattern pop.
| Species | Janka (lbf) | Color | Role |
|---|---|---|---|
| Hard maple | 1450 | Creamy white | Light squares |
| Walnut | 1010 | Chocolate brown | Dark squares |
| Cherry | 950 | Warm amber-red | Light or accent |
| Jatoba | 2690 | Deep reddish-brown | High-contrast dark |
| Purpleheart | 2520 | Vivid purple | Bold accent |
The classic pairing is walnut + hard maple. The contrast is dramatic, both species are readily available at hardwood dealers, and both are dense enough for years of use. If you want something warmer, cherry substitutes for maple nicely — you lose some of the stark contrast but gain a richer color story as the cherry deepens with age and oil.
For bolder color combinations, walnut + purpleheart produces a striking brown-and-purple board that's become increasingly popular. Just be aware that purpleheart dust requires a good respirator, and the color fades somewhat toward brown over time without regular mineral oil conditioning.
Before finalizing species, read the guide to choosing the best wood for a cutting board — especially the section on open-pore woods. Red oak looks beautiful in a checkerboard but is a food-safety problem; its large pores trap bacteria even after thorough washing.
Understanding the Geometry
A checkerboard end-grain board is built from a primary slab that is then sliced crosswise. Here's the sequence at a high level:
- Rip strips of alternating species to identical widths.
- Glue strips into a laminated panel (primary slab), alternating species as you go.
- Crosscut the panel into slices of your target board thickness (typically 1.5–2 inches).
- Rotate every other slice 180 degrees and re-glue the slices into the final board. This is the step that creates the checkerboard — each slice's strips now interleave with the adjacent slice's strips.
The critical dimension is strip width — measured perpendicular to the rip fence. This determines the size of each square on the finished board. Common choices:
- ¾ inch — fine, dense pattern; suits smaller boards and charcuterie pieces
- 1 inch — the versatile standard; looks bold at kitchen-counter distance
- 1¼ inch — large squares; best on big boards (16 × 22 inches and up)
Planning Strip Count and Board Dimensions
This is where most builders get tripped up. The final board size is a function of how many strips you include and how wide each strip is — you can't just decide on a target size without working backward through the strip math.
Here's the approach:
Step 1: Choose strip width (W) Let's use 1 inch as our example.
Step 2: Decide how many squares you want across the board width For a clean checkerboard, you need an even number of strips in the primary slab so that alternating slices produce a true checkerboard offset. Let's say 10 strips across.
Step 3: Calculate raw slab width Raw slab width = (number of strips × strip width) + (kerf × number of cuts) + glue compression allowance
With 10 strips at 1 inch, 9 glue joints (negligible thickness), and a table saw kerf of 0.125 inches:
- Raw strips needed before the rip: 10 strips × (1 inch + 0.125 inch kerf) = approximately 11.25 inches of starting material per species pair
Step 4: Determine crosscut slice thickness Your slice thickness becomes the board thickness. Most builders target 1.5 to 2 inches for a functional board. Thicker boards are heavier but more durable over the long term.
Step 5: Calculate how many slices (= how many squares the board is tall) A 12-inch-long board using 1-inch squares needs 12 slices, but remember you'll rotate every other slice — so your primary slab needs to be at least 12 × 2 inches = 24 inches long before crosscutting (accounting for kerf at each crosscut).
Working this out by hand for every configuration is tedious, especially when you want to explore different strip widths or board dimensions. This is exactly the kind of iteration where a planning tool like Cutting Board Designer saves real time: adjust the strip width or layer count and the cut list and board dimensions update instantly, so you can see the impact on material requirements before buying wood.
Kerf and Waste: Budget Carefully
Blade kerf is the silent budget-killer on checkerboard boards. Every rip cut and every crosscut removes 0.125 inches of material (on a typical table saw blade). With 10 strips, that's 9 rip cuts per panel — nearly 1.125 inches of wood turned to sawdust just getting the strips to width. Then the crosscuts remove another 0.125 inches per slice.
Budget your starting lumber at 15–20% over your net material requirements to absorb:
- Rip and crosscut kerf
- Jointing passes to clean up edges
- One or two slices sacrificed to test the assembly sequence
- Flattening passes on the finished board
The end-grain cutting board wood calculator guide goes into detail on calculating board feet — worth reading before you place a lumber order.
Assembly Sequence
Getting the sequence right is more important on a checkerboard than almost any other pattern. Here's what works:
-
Mill all strips to identical dimensions. Joint one face, plane to consistent thickness, rip to target width on the table saw. Every strip should be the same cross-section — if strip widths vary even slightly, your squares won't be square.
-
Glue up the primary slab. Alternate species as you go. Use cauls (flat clamping boards) to keep the panel from bowing under clamp pressure. Let cure 24 hours minimum.
-
Joint one face of the primary slab flat, then run it through the planer to flatten both faces. The slab needs to be perfectly flat before crosscutting — any bow will become inconsistency in your final board.
-
Crosscut slices at your target thickness (plus a small oversize for final flattening, usually 0.1 inch extra). Label each slice in sequence as you cut.
-
Rotate every other slice 180 degrees. Lay them out on a flat surface before gluing to visually confirm the checkerboard pattern aligns correctly.
-
Glue up the final board. Apply glue to the flat faces of the slices, clamp across the width, and use cauls again. The end-grain faces are what you're joining here — apply glue to the entire face, not just the edges.
-
Flatten the finished board through a drum sander or with a hand plane, then sand through 80 → 120 → 180 → 220 grit.
Finishing
End-grain boards absorb oil rapidly, which is both a feature and a requirement. Plan to condition three times before the board is ready to use:
- Flood the surface with food-grade mineral oil and let it soak 20 minutes. Wipe off excess.
- Repeat after 24 hours.
- Repeat once more after another 24 hours.
After the initial conditioning, apply a board butter (typically 4:1 mineral oil to beeswax, melted together and cooled to solid). This hardens on the surface and makes the board easier to clean than oil alone.
The first oil flood is also the moment the checkerboard snaps into full contrast — walnut goes deep chocolate, maple holds cream, and the alternating grid becomes visually unmistakable. It's a satisfying moment that makes the planning work worthwhile.
Condition the board monthly (or whenever it looks dry) to maintain the wood's moisture barrier and extend its life.
Before You Buy Lumber
A well-planned checkerboard board uses wood efficiently, but underbuying is a common mistake — you don't want to source a second lot of walnut mid-project and find the color doesn't match. Calculate your full cut list, including a realistic waste factor, before going to the lumber yard.
If you want to see your board rendered before cutting, Cutting Board Designer provides a 2D top-down preview of your checkerboard layout and generates a material cut list based on your target dimensions, strip width, and kerf. It's a faster way to find the right configuration than building test panels — and when you see the walnut-and-maple grid on screen for the first time, you'll want to start cutting immediately.