End-Grain Cutting Board Size Guide: Thickness, Length & Width
Get the dimensions wrong and a beautiful board becomes either a wobbly lightweight or a back-breaking slab — here's how to size yours right.
You've picked your wood species. You've decided on a pattern. You know the blade kerf on your table saw. But before any of that turns into lumber purchases, there's a more fundamental question to settle: how big should this board actually be?
End-grain cutting board sizing isn't arbitrary. The thickness determines how long the board lasts under heavy use and whether it'll warp. The width and length determine whether someone will actually use it or leave it on the counter as decoration. And the combination of all three determines the weight — which affects whether it stays put while you're cutting and whether it's comfortable to move.
Here's how to think through every dimension before you make a single cut.
Why Thickness Is the Most Important Dimension
For an edge-grain or face-grain board, thickness is mostly about rigidity and aesthetics. For end-grain, it's structural.
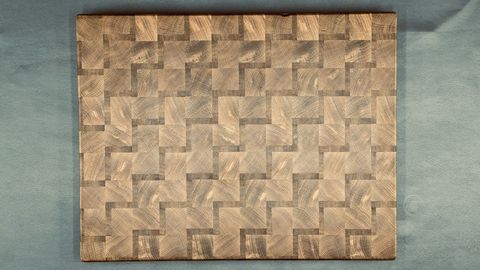
End-grain boards work by letting knife edges slide between wood fibers rather than across them. Those fibers close back up after each cut, which is why a well-maintained end-grain surface stays looking clean for years while an edge-grain board gradually develops deep scratches. But that self-healing behavior depends on having enough material depth to absorb cuts over time. A thin end-grain board will develop divots and grooves that collect bacteria long before a thicker one shows any visible wear.
The other issue is warping. End-grain panels move with humidity across their width and length rather than their thickness, and they move more aggressively than face-grain panels. Thickness provides the mass and rigidity to resist that movement. A board that's too thin will cup noticeably with seasonal humidity changes, even with good finishing.
Minimum thickness for end-grain boards:
| Use Case | Minimum Thickness | Recommended |
|---|---|---|
| Light prep / serving | 1½ in (38 mm) | 1¾ in (45 mm) |
| General kitchen use | 1¾ in (45 mm) | 2 in (50 mm) |
| Heavy-duty / professional | 2 in (50 mm) | 2½ in (63 mm) |
| Butcher block / gift showcase | 2¼ in (57 mm) | 2½–3 in (63–76 mm) |
For most home kitchen boards, 1¾ to 2 inches is the sweet spot. It's thick enough to be stable and long-lasting, but not so heavy that lifting it out of a cabinet is a chore.
How Thickness Connects to Your Strip Width
Here's the dimension that surprises most first-time end-grain builders: the thickness of your finished board equals the width of the strips you rip in the first stage of the build.
The standard end-grain construction sequence is:
- Rip lumber into strips of uniform width
- Glue up strips face-to-face into a panel
- Crosscut the panel into slices perpendicular to the glue joints
- Rotate each slice 90° so end grain faces up
- Glue the slices together to form the board
That crosscut in step 3 is what creates your board's thickness, and the distance of each crosscut is what creates the slices' height — which is also your board's thickness. In other words: strip width = board thickness.
So if you want a 2-inch-thick board, you need to rip your strips 2 inches wide (plus jointing allowance). This affects how many strips you can yield from each board-foot of lumber and feeds directly into your cut list calculations.
Width and Length: Use-Case Driven
Once you've settled on thickness, width and length are about how the board will actually be used. There are two main categories: prep boards and display/serving boards.
Prep Board Sizing
A prep board needs to be large enough that food doesn't fall off the edge while you're cutting, but small enough that it fits comfortably at the work surface and in the sink. Standard kitchen counter depth is 25 inches, which means most prep boards max out around 18 inches in one dimension to allow room for the cook to stand.
| Board Type | Typical Width × Length |
|---|---|
| Small prep (one person) | 10 × 14 in |
| Medium prep (everyday use) | 12 × 18 in |
| Large prep (family cooking) | 15 × 20 in |
| Extra-large / island board | 18 × 24 in |
The 12×18 inch size is the most popular for good reason. It fits under a standard 24-inch-wide upper cabinet with room to spare, handles a large head of cabbage or a half watermelon, and comes in under 8 pounds at 2-inch thickness in maple and walnut — heavy enough to stay put, light enough to handle easily.
Display and Serving Boards
Serving boards, bread boards, and charcuterie-style boards prioritize visual impact and presentation. They tend to be thinner (1½ to 1¾ inches) and often longer relative to their width, since they'll be carried to the table rather than worked on heavily.
Common serving board proportions run 10×16, 10×20, or 12×18 — similar footprint to prep boards but skewing narrower and longer for the platter aesthetic. If you want to also use it as a charcuterie board, keep the width at 10 inches or more so there's room to arrange items without everything falling off the edge.
Check out this post on end-grain cutting board design for charcuterie for more on how serving-board proportions affect pattern selection.
Weight: The Dimension Nobody Mentions Until It's Too Late
A fully glued and finished end-grain board is heavy. Maple runs about 3.6 lb/board-foot; walnut is slightly lighter at 3.0 lb/board-foot. For a 12×18×2-inch board (which is 1.5 board-feet of surface at 2-inch thickness), you're looking at roughly 5–6 pounds for maple, slightly less for walnut.
That's manageable. But at 15×20×2½ inches, you're approaching 10–12 pounds — which starts to feel inconvenient for daily use. Big boards are impressive, but they often end up living permanently on the counter because taking them in and out of a cabinet becomes a nuisance.
Weight estimates by common board size (maple, 2-inch thickness):
| Dimensions | Approx. Weight |
|---|---|
| 10 × 14 in | ~3.5 lb |
| 12 × 18 in | ~5.5 lb |
| 15 × 20 in | ~8.5 lb |
| 18 × 24 in | ~12 lb |
For gift boards especially, think about who's receiving it. A board for a single person in a small apartment should probably stay at 10×14 or 12×16. A board for someone who cooks for a family or entertains regularly can go bigger. The end-grain cutting board gift guide covers sizing by recipient in more detail.
How Blade Kerf Changes Your Lumber Budget
For face-grain or edge-grain boards, kerf waste is minimal — you're making a few rip cuts and that's it. For end-grain boards, kerf losses stack up because you're making many repeated cuts: one for each strip, then one for each slice.
A standard table saw kerf is about 1/8 inch (3mm). If you're ripping 2-inch strips from 8-inch-wide lumber, you'll get three strips per board with roughly ½ inch of kerf waste — not significant. But when you crosscut a glued-up panel into 2-inch slices, you're making a cut every 2⅛ inches (slice thickness plus kerf). For a 14-inch-wide panel, that's six slices with six kerfs, totaling ¾ inch of panel width consumed as sawdust.
That waste doesn't change your finished board dimensions, but it does change how much panel length you need to yield your target number of slices. Account for it when buying lumber, or you'll come up short.
Cutting Board Designer handles all of this math automatically: you enter your strip width, panel dimensions, board width and length, and kerf, and it produces a cut list that accounts for every saw pass. It's particularly useful when you're trying to squeeze a specific board size out of a limited piece of lumber. The full design workflow is covered in the end-grain cutting board design guide.
A Practical Starting Point
If you're building your first end-grain board and want a size that's universally useful, well-proportioned, and manageable to build, this is a solid target:
- 12 inches wide × 18 inches long × 2 inches thick
- Maple and walnut in equal proportions
- Standard ½-inch strip width, 8–10 strips across
That gives you a ~5.5-pound board that handles everyday prep, photographs well, works as a casual serving board, and makes an excellent gift. It's also forgiving to build — the panel is small enough that you can flatten it on a router sled or with a belt sander, and glue-up pressure is easy to manage with eight or ten bar clamps.
Once you've built one at this size, you'll have an intuitive feel for how strip count, panel dimensions, and slice yield interact. That's when the larger and more elaborate builds start to make sense.
Ready to plan your board down to the last strip? Cutting Board Designer lets you set every dimension — strip width, board width and length, kerf, row count — and generates a full cut list so you know exactly how much lumber to buy before you set foot in the hardwood dealer.