How to Design a Herringbone End-Grain Cutting Board
The herringbone pattern has been dressing up floors for centuries — now it's showing up on kitchen counters, and for good reason.
Walk into any woodworking forum in 2026 and you'll see two patterns dominating the cutting board conversation: the 3D cube illusion and the herringbone. The cube grabs attention for its optical trick. The herringbone earns its place for a different reason: it's sophisticated without being fussy, works beautifully with just two wood species, and the geometry — while demanding — is more forgiving than 60-degree parallelograms.
This guide covers everything you need to plan a herringbone end-grain board before you make a single cut.
Why Herringbone Is Having a Moment
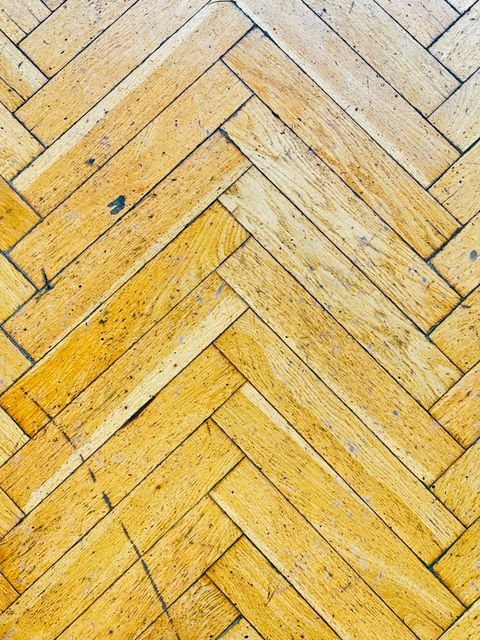
Parquet herringbone flooring has been trending hard in interior design since about 2023, and that aesthetic is bleeding directly into woodworking. People who grew up seeing herringbone on floors now want it on their kitchen counters, and the end-grain construction adds a dimension parquet never could: every column of the V-pattern reveals a mosaic of growth rings instead of face grain, so the texture is richer up close than it looks in photos.
A few practical reasons it's surging in popularity:
- Two species is enough. Unlike the cube illusion, which needs three tonal steps, herringbone works perfectly with walnut and maple — a pairing every hardwood dealer stocks.
- The math is accessible. The 45-degree angle is easy to set on most miter saws and table saw sleds without a custom jig.
- It scales to any board size. A small 8 × 10 charcuterie board and a 14 × 20 butcher block use the same approach — just a different number of V-units.
Understanding the Geometry
A herringbone pattern is made of rectangular strips arranged so each pair forms a chevron — two strips meeting at a center spine, angled outward in opposite directions. When you stack chevrons top-to-bottom, the angled ends of one row nest into the angles of the next, creating the continuous zigzag.
For end-grain construction, those rectangles are cut from square-sectioned blanks so their end faces become the cutting surface. Here's the anatomy:
- Each V-unit = two strips of equal width and length, mitered at 45° on one end, butted square on the other.
- The "spine" = the center seam where the two strips meet. This runs the full length of the board.
- Row direction = V-units alternate left-right. Row 1 opens upward (∧), row 2 opens downward (∨), and so on.
The critical dimension is the strip width (measured across the face of the blank before cutting). This determines how bold or fine the zigzag looks. Narrow strips (¾ inch) produce a dense, textile-like pattern. Wider strips (1¼ inch) make the V-shapes dominant and architectural. Most builders land around 1 inch as a versatile middle ground.
Choosing Your Woods
You need contrast — the zigzag only reads clearly if light and dark alternate. For herringbone, two species usually beats three because the clean alternation of light-dark-light-dark is what drives the eye across the board.
| Species | Janka (lbf) | Color | Role |
|---|---|---|---|
| Hard maple | 1450 | Creamy white | Light strips |
| Walnut | 1010 | Chocolate brown | Dark strips |
| Cherry | 950 | Warm amber | Light or accent |
| Jatoba | 2690 | Reddish-brown | High-contrast dark |
The classic pairing is walnut + maple. It's a reliable contrast, both species are food-safe, dense, and widely available. For something warmer, swap maple for cherry — you lose some contrast but gain a richer color story as the cherry ages.
Before committing to species, read the guide to choosing the best wood for a cutting board — especially the section on open-pore woods to avoid. A herringbone board with red oak strips will look stunning right up until the pores trap bacteria.
Planning Strip Count and Board Dimensions
This is where most first-timers stall. The herringbone layout means your final board width and length are both determined by the strip geometry, not the other way around — you can't just pick "12 × 18 inches" and expect the pattern to land cleanly at the edges.
Work through it this way:
- Decide strip width (W). Let's use 1 inch.
- Choose how many V-units across (N). Each V-unit contributes 2W to the board width before glue compression. At 1-inch strips, 6 V-units gives roughly 12 inches of width.
- Choose how many V-rows tall (R). Each row's height contribution equals W (the strip width) projected onto the vertical axis. For 1-inch strips at 45°, each row adds approximately 1 inch of height. 14 rows → roughly 14 inches of length.
- Account for kerf and glue squeeze. A table saw kerf removes about 0.125 inches per cut. Budget a 5–8% oversize on your blanks and trim the finished slab to final dimension after gluing.
The tricky part: the 45° miters mean your starting blank length needs to accommodate the diagonal. A strip that will be 1 inch wide in the finished board needs to start at about 1.4 inches (1 × √2) to survive the miter cut with enough material. Working this out by hand for every dimension change is tedious.
This is the kind of iterative planning that the end-grain cutting board design guide covers in detail — and where a tool like Cutting Board Designer pays off. Adjust strip width in the app, and the strip count, blank dimensions, and cut list update instantly. You can experiment freely without burning wood on test cuts.
Assembly Sequence
Get the glue-up sequence wrong and your chevrons won't align. Here's the approach that works:
- Prepare blanks to a consistent square section. If your target strip width is 1 inch, joint and plane your blanks to exactly 1 × 1 inches in cross section (plus saw allowance).
- Miter one end of each blank at 45°. Cut all pieces from one species with the angle going the same direction. The second species gets the mirror image. Label them clearly.
- Assemble V-units first. Pair one strip of each species into a chevron on a flat reference surface. Use tape clamps to hold the miter joint tight while the glue tacks. Let these cure before moving on.
- Glue V-units into rows. Alternate the chevron direction (∧∨∧∨) and glue row by row. Clamp across the width, not diagonally — diagonal clamping rotates the pieces out of registration.
- Let the slab cure fully (24 hours minimum) before milling flat.
- Slice crosswise to final thickness. These crosscut slices become your end-grain boards. Reglue any slice panels needed to reach your target board thickness.
Flattening and Finishing
End-grain surfaces telegraph every glue line if they're not flat. Run the glued slab through a drum sander or use a router sled before the crosscut slices. After gluing up the final board, flatten again.
Sand through 80 → 120 → 180 → 220 grit. Then flood with food-grade mineral oil and let it soak 20 minutes. Repeat twice over 48 hours. The oil will dramatically deepen the walnut and warm the maple — the moment you wipe off the first flood coat is when the herringbone snaps into full contrast for the first time.
A finishing wax layer (4:1 mineral oil to beeswax, melted together) hardens on top of the oil and makes the surface easier to clean.
Plan Before You Cut
Herringbone is one of those patterns that rewards patience at the planning stage. Figure out your strip width, count your V-units, work out your blank requirements, and verify the board size lands where you want it before you buy lumber.
If you want to visualize the finished pattern and generate a cut list you can take to the lumber yard, Cutting Board Designer renders a 2D preview of your layout and calculates material requirements automatically. It's considerably faster than drawing zigzags on graph paper — and the first time you see your walnut-and-maple herringbone rendered on screen, you'll want to build it immediately.